DTF Transfer with Epson Printer: Complete Setup & Process Guide
Eazy DTFEpson printers have emerged as a powerful solution for DTF (Direct to Film) transfers, offering precision and reliability that many crafters and small businesses trust. While Epson may not be the first brand you associate with custom apparel printing, these printers deliver exceptional results when properly configured for DTF applications.
Whether you're just starting with DTF printing or looking to upgrade your current setup, understanding how to optimize your Epson printer can transform your transfer quality and business efficiency.
Key Takeaways
- Epson EcoTank printers excel at DTF transfers due to their precision, detail capabilities, and cost-effective ink systems
- Proper setup requires white ink cartridge installation and specific printer settings adjustments
- The DTF transfer process involves printing mirrored designs, applying adhesive powder, and heat pressing onto garments
- Common issues stem from incorrect temperature settings, uneven powder application, and improper fabric preparation
Understanding DTF Transfer Technology
DTF transfer technology represents a significant advancement in custom apparel printing. The process involves printing your design onto a special PET film, applying thermoplastic adhesive powder, and then transferring the complete design onto fabric using heat and pressure.
Unlike other transfer methods, DTF works on virtually any fabric type and color without requiring special treatments or fabric preparation. The adhesive powder bonds the ink to the fabric during the heat press process, creating transfers that maintain flexibility and washability.
The key advantage of DTF over traditional methods lies in its versatility. You can print white ink as an underlayer, enabling vibrant colors on dark fabrics. This capability makes DTF particularly valuable for custom DTF transfers that need to pop on any garment color.
Why DTF Printing Dominates Custom Apparel Industries
DTF printing has become essential across multiple industries due to its unique combination of quality, versatility, and efficiency. Fashion brands rely on DTF for producing limited edition designs and prototype testing. Sports teams use DTF transfers for custom jerseys and fan merchandise that must withstand frequent washing and wear.
The promotional products industry particularly values DTF's ability to produce small batch runs cost-effectively. Whether creating corporate branded apparel or event-specific merchandise, DTF delivers consistent results without the high setup costs associated with traditional screen printing.
Event planners and party organizers appreciate DTF's quick turnaround times. DTF transfers for parties can be designed, printed, and applied within hours, making last-minute customization possible. This flexibility has made DTF the go-to solution for businesses requiring responsive, high-quality custom apparel production.
Why Choose Epson Printers for DTF Transfers

Epson printers, particularly the EcoTank series, offer several advantages for DTF printing applications. Their piezoelectric printhead technology delivers precise ink droplet placement, resulting in sharp details and smooth color gradients essential for professional-quality transfers.
The EcoTank system's refillable ink tanks significantly reduce operating costs compared to traditional cartridge-based systems. This cost efficiency becomes crucial when producing high volumes of transfers or running a DTF printing business where margins matter.
Epson's print driver software provides extensive color management options, allowing fine-tuning of color profiles specifically for DTF applications. This control ensures consistent color reproduction across different batches and fabric types.
Most importantly, many Epson models can be modified to accommodate white ink cartridges. White ink capability is essential for DTF printing, as it serves as an underlayer that makes colors vibrant on dark fabrics and provides the opacity needed for quality transfers.
Setting Up Your Epson Printer for DTF Printing
Preparing your Epson printer for DTF printing requires several critical steps to ensure optimal performance and print quality. Start by verifying your specific Epson model's compatibility with DTF modifications, as not all models support the necessary white ink conversion.
The white ink installation process typically involves replacing one or more color cartridges with white ink cartridges. This modification may require specific conversion kits designed for your printer model. Research reputable suppliers who offer complete conversion kits with detailed installation instructions.
Once white ink is installed, configure your printer settings for DTF media. Select "Premium Glossy Photo Paper" or similar high-quality photo paper settings in your print driver. This setting ensures proper ink density and droplet placement on DTF film.
Essential printer configuration steps include:
- Install white ink cartridges according to manufacturer specifications
- Load DTF film with the printable side facing the correct direction
- Adjust print quality to highest settings for optimal detail reproduction
- Configure color management for DTF-specific color profiles
- Run alignment and nozzle check tests to ensure all colors print correctly
Test your setup with a small sample design before committing to larger projects. This testing phase helps identify any adjustment needs and ensures your DTF transfers will meet quality expectations.
Complete DTF Transfer Process with Epson Printers
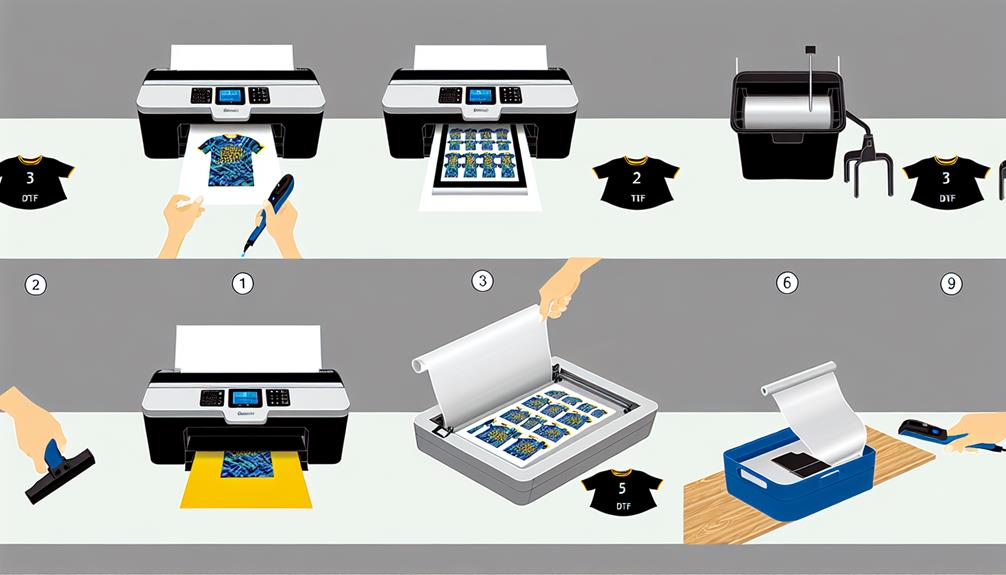
The DTF transfer process with Epson printers follows a precise sequence that ensures professional results. Begin by preparing your design file, ensuring all text and directional elements are mirrored horizontally. This mirroring step is crucial because the design transfers in reverse during application.
Print your design onto DTF film using the configured Epson printer settings. The printer will first lay down the colored inks, followed by the white ink underlayer. This white layer provides opacity and color vibrancy on dark fabrics.
Immediately after printing, while the ink is still wet, apply DTF adhesive powder evenly across the entire printed area. Use a powder shaker or sieve for consistent coverage. The powder adheres to the wet ink and forms the bonding agent between the transfer and fabric.
Cure the printed and powdered transfer using a heat source such as a curing oven, heat gun, or conveyor dryer. Proper curing melts the powder and creates a stable transfer ready for application. The transfer should feel dry and slightly tacky when properly cured.
Finally, position the cured transfer on your garment and apply using a heat press at approximately 300-320°F for 10-15 seconds with medium pressure. Allow the transfer to cool completely before removing the carrier film to reveal your finished design.
Troubleshooting Common Epson DTF Transfer Issues
Even with proper setup, DTF printing can present challenges that affect transfer quality. Understanding these common issues and their solutions helps maintain consistent production quality and reduces material waste.
Powder adhesion problems often result from insufficient ink coverage or incorrect powder application timing. Ensure your design has adequate ink density, particularly in solid color areas. Apply powder while ink remains wet, typically within 30-60 seconds of printing completion.
Color inconsistency issues may stem from clogged print nozzles, incorrect color profiles, or inconsistent ink flow. Run regular nozzle checks and cleaning cycles to maintain print head health. Use DTF-specific color profiles rather than generic photo paper settings for accurate color reproduction.
Transfer durability problems usually relate to incorrect heat press parameters or insufficient curing. Verify your heat press temperature using an infrared thermometer, and ensure consistent pressure across the entire transfer area. Under-cured transfers may appear glossy and fail to bond properly with fabric.
Key troubleshooting strategies include:
- Monitor powder application thickness for consistent coverage without excess buildup
- Maintain proper heat press temperature between 300-320°F for optimal bonding
- Test different fabric types to understand how DTF performs on various materials
- Keep detailed records of successful settings for future reference
- Join online DTF communities for peer support and troubleshooting advice
For complex issues or business-critical production needs, consider investing in DTF sample packs to test different approaches and identify optimal settings for your specific requirements.
Maximizing Your DTF Business Success
Successfully operating a DTF printing business with Epson printers requires understanding both the technical aspects and market opportunities. Focus on niche markets where DTF's advantages shine, such as small batch custom orders, intricate designs, or quick-turnaround projects.
Consider offering specialized services like DTF transfers for sports teams or DTF transfers for small businesses to differentiate your services and command premium pricing.
Maintain equipment properly by performing regular maintenance cycles, using quality inks and films, and keeping detailed production records. This attention to detail ensures consistent quality that builds customer trust and repeat business.
Frequently Asked Questions
Can You Use an Epson Printer for DTF Transfers?
Yes, many Epson printers work excellently for DTF transfers after proper modification. Epson EcoTank models are particularly popular due to their cost-effective ink systems and modification-friendly design. You'll need to install white ink cartridges and adjust printer settings for DTF film compatibility. The piezoelectric printhead technology in Epson printers delivers the precision required for high-quality DTF transfers.
What Modifications Are Required for Epson DTF Printing?
Epson DTF modifications typically involve installing white ink cartridges in place of one or more color cartridges, usually replacing the light cyan and light magenta positions. You'll also need to install DTF-specific printer drivers or RIP software that supports white ink management. Some users add external ink tanks for continuous operation. These modifications void the printer warranty but significantly expand DTF printing capabilities.
How Much Does It Cost to Convert an Epson Printer for DTF?
Converting an Epson printer for DTF typically costs between $200-500, depending on your specific model and chosen conversion kit. This includes white ink cartridges, modification hardware, and any necessary software. While this represents a significant upfront investment, it's much more affordable than purchasing dedicated DTF printers that can cost thousands of dollars.
What DTF Film Works Best with Epson Printers?
High-quality PET DTF films with good ink absorption work best with Epson printers. Look for films specifically designed for piezoelectric printers, as they're formulated to work with water-based DTF inks. The film thickness should be around 75 microns for optimal handling and transfer quality. Avoid films designed for toner-based systems, as they may not provide proper ink adhesion.
Can I Print DTF Transfers at Home with an Epson Printer?
Absolutely! Home DTF printing with Epson printers is increasingly popular among crafters and small business owners. You'll need the modified printer, DTF film, adhesive powder, and a heat press. Start with simple designs to master the process before attempting complex multi-color transfers. Custom DTF transfers from home can be both rewarding and profitable with proper technique and equipment.